Concurrent Android UI automation with Jenkins
Using multiple Android devices to execute concurrent Calabash Android automation tests via Jenkins CI
Posted on Apr 15, 2015
by Ha Duy Trung

PropertyGuru is a regional company, serving multiple markets in Asia. To provide a consistent but local user experience for all our markets, many of our products share the same UI logic with variants, or flavors. As the product grows, or more variants are introduced for new market, the time it takes to test all those variants increases propotionally with the number of variants. Even with the support of UI automation frameworks, such as Calabash Android, an original daily automation suite of 2 hours can quickly grow into a staggering 8-hour job for 4 product variants.
This blog post introduces an approach to drastically reduce automation time in such cases, by concurrently executing UI automation for different product variants via a Continuous Integration (CI) server. We choose to run UI automation tests on actual devices rather than emulators for several reasons:
- More realistic automation: There are things that we can only spot on real devices
- Light memory and CPU consumption on host machine: An emulator usually consumes a large chunk of computer resources, while a USB-connected device consumes almost nothing
- It’s cheap! Android devices are cheap. You can easily add a used device to the device cluster, while the number of emulators are bound by computer resources, and they are expensive
Even though the blog uses Calabash Android automation framework and Jenkins CI, the general approach can be applied to any automation tests executing via Android Debug Bridge (ADB) on any CI server.
Set up Jenkins slaves and slave group
Jenkins slave is the first thing one needs to set up to prepare for distributed builds, the process of delegating the build workload to multiple ‘slaves’. One can configure Jenkins slaves/nodes by navigating through Jenkins -> Manage Jenkins -> Manage Nodes.
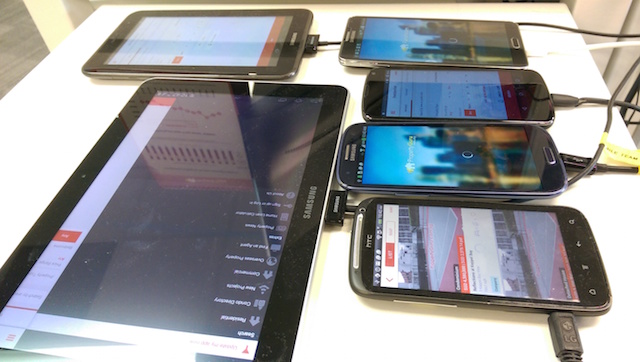
By definition, a Jenkins slave is a computer that is set up to offload build tasks from the main computer that hosts Jenkins. In our case, the build task is automation test, while the ‘computer’ that runs it is a physical Android device. For this, all the slaves can be running on the same machine that have physical Android devices plugged in via USB cables, which allows ADB commands. The master Jenkins communicates with these Android agents via this machine.
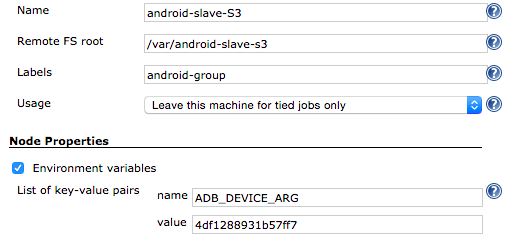
Below is our setup for a slave connecting to a Samsung S3.

As all slaves run on the same machine, it is recommended that different file system roots are used for different slave nodes, as they will be likely where the test results are stored. Having them all point to the same root may result in test results being overriden by different nodes. This can be set via Remote FS root configuration.
Remote FS root
A slave needs to have a directory dedicated to Jenkins. Specify the absolute path of this work directory on the slave, such as '/var/jenkins' or 'c:\jenkins'. This should be a path local to the slave machine. There's no need for this path to be visible from the master, under normal circumstances.
Slaves do not maintain important data (other than active workspaces of projects last built on it), so you can possibly set the slave workspace to a temporary directory. The only downside of doing this is that you may lose the up-to-date workspace if the slave is turned off.
While separate FS roots and multi-processors allow concurrent Calabash executions, ADB_DEVICE_ARG environment variable is needed to instruct Calabash which device it should send ADB commands to, in case of multiple connected devices. Under the hood, Calabash automates UI via ADB commands. The value for this environment variable can be found via adb devices command. As one device maps directly to one slave node, ADB_DEVICE_ARG should be set at node level via ‘Environment variables’ configuration, which will be then available at job level.
Environment variables
These key-value pairs apply for every build on this node and override any global values. They can be used in Jenkins' configuration (as $key or ${key}) and be will added to the environment for processes launched from the build.
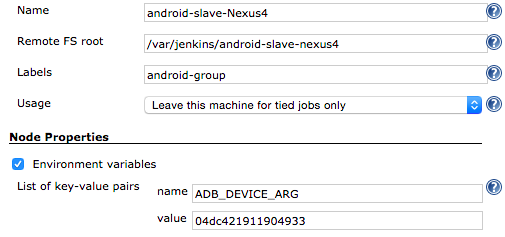
Similar setup for a slave connecting to Nexus 4.

If you notice, all the slave nodes are configured with the same label ‘android-group’. This serves the purpose of grouping them so that when needed, we can conveniently summon all nodes under a specific group.
Labels
Labels (AKA tags) are used for grouping multiple slaves into one logical group. Use spaces between each label. For instance 'regression java6' will assign a node the labels 'regression' and 'java6'.
For example, if you have multiple Windows slaves and you have jobs that require Windows, then you can configure all your Windows slaves to have the label 'windows', then tie the job to the 'windows' label. This allows your job to run on any of your Windows slaves but not on anywhere else.
Now if we check ‘android-group’, we can see all the node tagged with label ‘android-group’ listed here. Adding another device to this group is as easy as copying an existing node and updating its ADB_DEVICE_ARG.

Set up concurrent job using slave group
With our Jenkins slaves and slave group in place, we can now set up a Jenkins job executing Calabash Android using the connected devices, via their respective slaves, represented by the group label ‘android-group’.

By checking both ‘Execute concurrent builds if necessary’ and ‘Restrict where this project can be run’, we allow the job to be executed concurrently, subject to node availability, using only nodes tagged with ‘android-group’. The restriction is to ensure that only nodes with connected devices are used for automation, as we may have other nodes with no connected devices used for other purposes.
Execute concurrent builds if necessary
If this option is checked, Jenkins will schedule and execute multiple builds concurrently (provided that you have sufficient executors and incoming build requests.) This is useful on builds and test jobs that take a long time ... It is also very useful with parameterized builds, whose individual executions are independent from each other...Now if we have 4 requests for automation, and 3 connected devices, it will take 2 rounds for them to clear all requests (the first round all 3 devices are utilized, 1 request is queued and picked up whenever a device becomes available again). This means that we can reduce the example automation time for 4 product flavors from 8 hours to 4 hours, or even less if 1 or more devices are added.
Trigger concurrent downstream jobs via upstream job
With the setup so far, we are already capable of manually triggering concurrent automations using as many connected devices as we want (subject to available USB ports!). But why manual trigger, if we can go all the way? Using ‘Jenkins Parameterized Trigger Plugin’, one can set up an upstream job to trigger multiple downstream jobs with parameters.
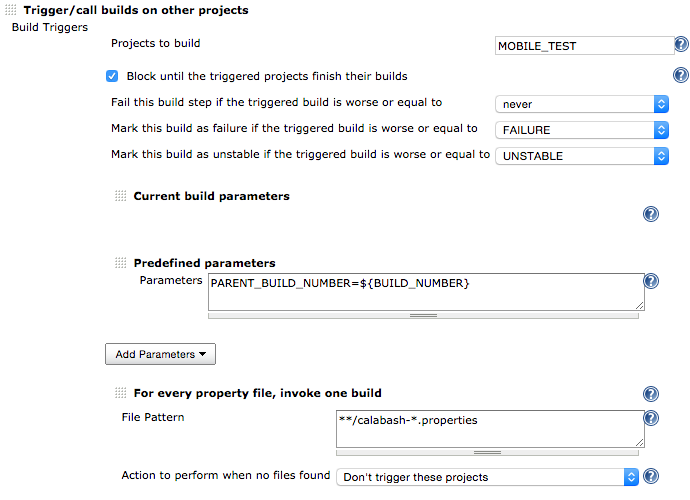
For example, if we want to test multiple app flavors concurrently using all available devices, set up an upstream job which executes the following:


The above configuration will trigger 3 concurrent ‘MOBILE_TEST’ downstream jobs (configured to ‘Execute concurrent builds if necessary’), each will test a specific app flavor ‘cherry’, ‘tomato’ and ‘raspberry’, sent to downstream job via a parameter called flavor. The upstream job will be blocked and wait for all downstream jobs to complete to set build status accordingly.
It is recommended that this upstream job runs on a different node/group than its downstream job, as otherwise it will occupy an available device without using it.

Now let’s recycle all those used devices and put their final miles to good use!